[Pro-face] [BLUE] สร้างสเกลด้วย Scale Converter (EP.10)

[Pro-face] [BLUE] สร้างสเกลด้วย Scale Converter (EP.10) “ BLUE Basic Training Guide EP.10 การสร้างสเกล เช่น Analog Scale, Percentage Scale “ ตัวอย่าง User-Defined Converters ในบทความนี้ จะเป็นการเปลี่ยนหน่วย Analog Scale จาก 4-20 mA เป็น 0-100% Part 1 : User-Defined Converters 1. ไปที่ Converters ในแถบ Project Explorer2. คลิกเลือก User-Defined Converters3. เลือก Scale 4. ตั้งชื่อ Converter5. กำหนด Source – […]
[KOYO] [KPP] Introduction Koyo PLC Programming Software (EP.2)

[KOYO] [KPP] Introduction Koyo PLC Programming Software (EP.2) “ KPP Basic Training Guide EP.2 บทความนี้จะแนะนำเการเริ่มต้นใช้งานโปรแกรม Koyo PLC Programming Software ซึ่งเป็นซอฟต์แวร์สำหรับเขียนโปรแกรมของ PLC KOYO DL05/DL06 DL205 DL405 SJ-Ethernet NK1. “ Overview โปรแกรม 1. เปิดโปรแกรม Koyo PLC Programming Software -> เลือก Start New Project -> แล้วเลือก CPU Model. 2. หน้าต่าง Menu ของ Software KPP. 3. หน้าต่าง แสดงชุดคำสั่ง […]
[Pro-face] [BLUE] การสร้าง Bar Chart (EP.11)

[Pro-face] [BLUE] การสร้าง Bar Chart (EP.11) ” BLUE Basic Training Guide EP.11 การสร้าง Bar Chart แสดงผลรูปแบบแผนภูมิแท่ง “ Part 1 : สร้างแผนภูมิ Bar Chart 1. ไปที่แถบ Tool Chest2. หมวด Shapes -> เลือก Rectangle3. ลาก Rectangle ไปวางบน Screen 4. ปรับแต่งสีและรูปร่าง Bar Chart ในแถบ Shape 5. เลือก Animation– กำหนดค่า Horizontal Scale ( scale แกน X […]
[Pro-face] [BLUE] การสร้าง Pie Chart (EP.12)
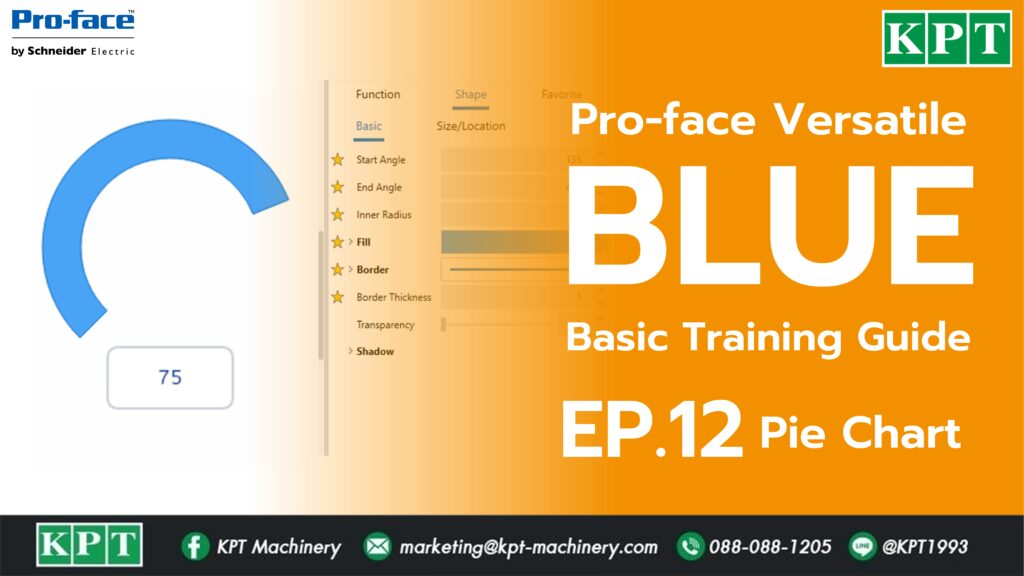
[Pro-face] [BLUE] การสร้าง Pie Chart (EP.12) BLUE Basic Training Guide EP.12 การสร้าง Pie Chart แสดงผลรูปแบบแผนภูมิวงกลม “ Part 1 : สร้างแผนภูมิ Pie Chart 1. ไปที่แถบ Tool Chest2. หมวด Shapes -> เลือก Arch3. ลาก Arch ไปวางบน Screen 4. ปรับแต่งขนาดและรูปร่าง Part 2 : สร้าง Scale Converter สร้าง Scale Converter กำหนด Maximum (Input) และ Minimum (Input) ตัวอย่าง Input […]
[Weintek] ตั้งจอเป็น Gateway ส่งค่าระหว่าง PLC – PLC ผ่านจอ HMI ด้วย Data Transfer
[Weintek] ตั้งจอเป็น Gateway ส่งค่าระหว่าง PLC – PLC ผ่านจอ HMI ด้วย Data Transfer “ Data Transfer สามารถส่งค่าจาก Address PLC ต้นทาง ไปยัง Address PLC ปลายทางได้ โดยใช้จอเป็น Gateway ตัวกลาง สามารถกำหนดรอบการส่งตามเวลา (Time-based) หรือคำสั่งทริกเกอร์ (Bit trigger) “ สร้าง Data Transfer 1. ไปที่แถบ Object2. เลือก Data Transfer 3. เลือกรูปแบบ Data Transfer– Per-page : Transfer เมื่อเปิดหน้า Screen ที่เลือก– Global : Transfer ตามเงื่อนไข […]
[Weintek] การแปลงไฟล์ .db เป็น .csv ด้วย EasyConverter
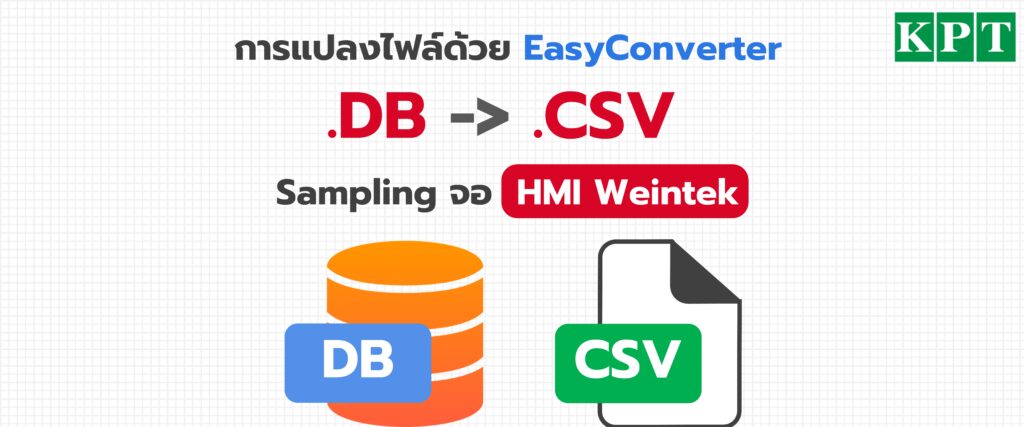
[Weintek] การแปลงไฟล์ .db เป็น .csv ด้วย EasyConverter “ ไฟล์จาก Sampling ของ HMI เป็นไฟล์ .db ที่สามารถนำไปใช้กับ Database ได้ทันที แต่หากต้องการเปิดด้วย MS Excel สามารถ Convert .csv ด้วย EasyConverter “ Part 1 : การแปลงไฟล์ .db เป็น .csv 1. เปิดโปรแกรม Utility Manager (ติดตั้งมาพร้อมกับ EasyBuilder Pro)2. เลือกแถบ Data Conversion3. คลิก EasyConverter 4. คลิกเมนู File -> Open…5. เลือกไฟล์ .db ที่ต้องการ Convert […]
[Pro-face] [BLUE] การใช้งาน Script เบื้องต้น (EP.13)
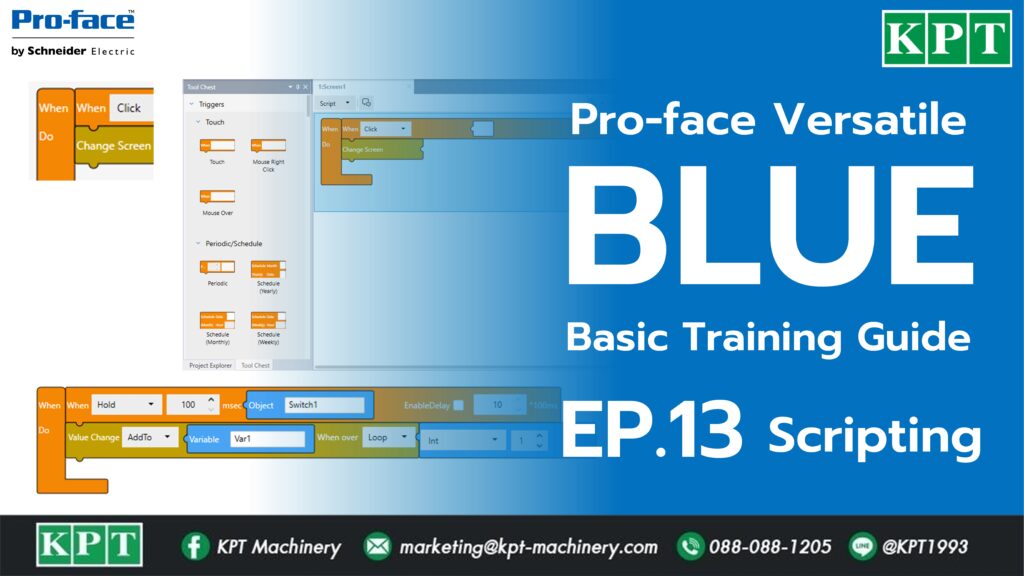
[Pro-face] [BLUE] การใช้งาน Script เบื้องต้น (EP.13) “ BLUE Basic Training Guide EP.13 การใช้งาน Script เบื้องต้น พร้อมตัวอย่างการใช้งาน “ Part 1 : รูปแบบ Block Script 1. Trigger Blocks : บล็อกสำหรับ Trigger คำสั่ง Script เช่น คลิกปุ่ม, ตั้งรอบเวลา 2. Operation Blocks : บล็อกสำหรับดำเนินการตามที่เลือก เช่น เปลี่ยนหน้าสกรีน, เปลี่ยนค่าคงที่ 3. Value Blocks : บล็อกเก็บค่า Object ต่างๆ เช่น เก็บค่าตัวแปร 4. Logic Blocks : บล็อกสำหรับกำหนดเงื่อนไขต่างๆ เช่น […]
[Pro-face] การเชื่อมต่อจอทัชสกรีน HMI กับ Barcode / QR Code Scanner

[Pro-face] การเชื่อมต่อจอทัชสกรีน HMI กับ Barcode / QR Code Scanner “ จอทัชสกรีน Pro-face สามารถเชื่อมต่อกับ Barcode Scanner เพื่ออ่านค่า Barcode / QR code ได้ผ่านทาง USB port หรือ Serial port “ Part 1 : การตั้งค่าการเชื่อมต่อ Barcode Scanner 1. ไปที่ Project Windows2. แถบ Peripheral Setting -> Input Equipment 3. ตั้งค่าการเชื่อมต่อ Bar Code 1– Type : Bar Code Reader หรือ […]
[Pro-face] [BLUE] การตั้งค่า Alarm Configuration (EP.14)
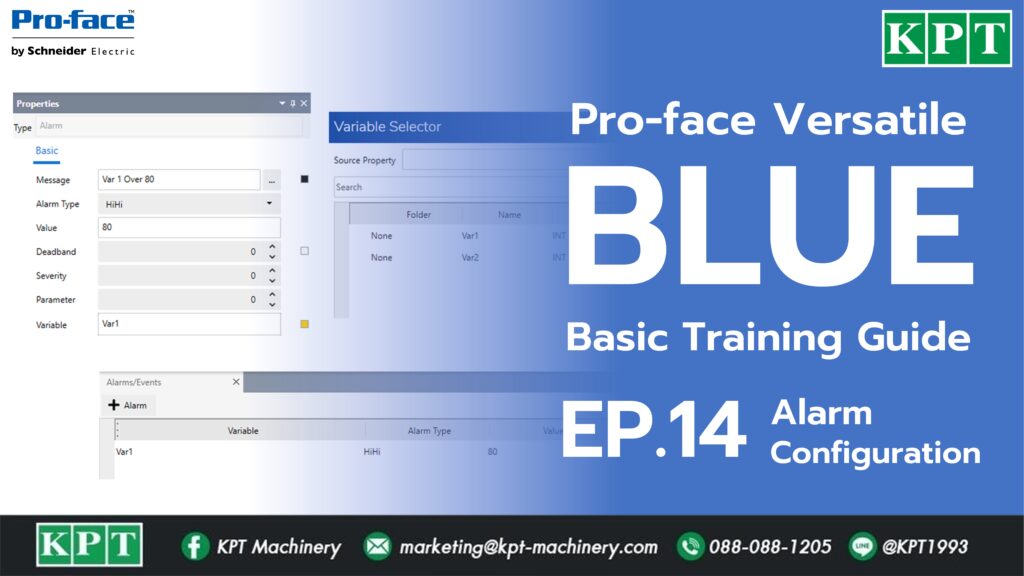
[Pro-face] [BLUE] การตั้งค่า Alarm Configuration (EP.14) “ BLUE Basic Training Guide EP.14 การตั้งค่าและเปิดใช้งานฟังก์ชัน Alarm “ Versatile Software BLUE ประกอบด้วย Alarm จำนวน 2 รูปแบบ ได้แก่– Bool Alarm : รูปแบบ Boolean เช่น OFF/ON, 0/1, ปิด/เปิด– Level Alarm : รูปแบบ Word เช่น ข้อมูลที่เป็นตัวเลข Part 1 : Add Alarm Group 1. ไปที่แถบ Project Explorer2. เลือก Alarms/Events3. คลิก All Alarms (0)4. […]
[Pro-face] [BLUE] การแสดงผล Alarm Summery (EP.15)
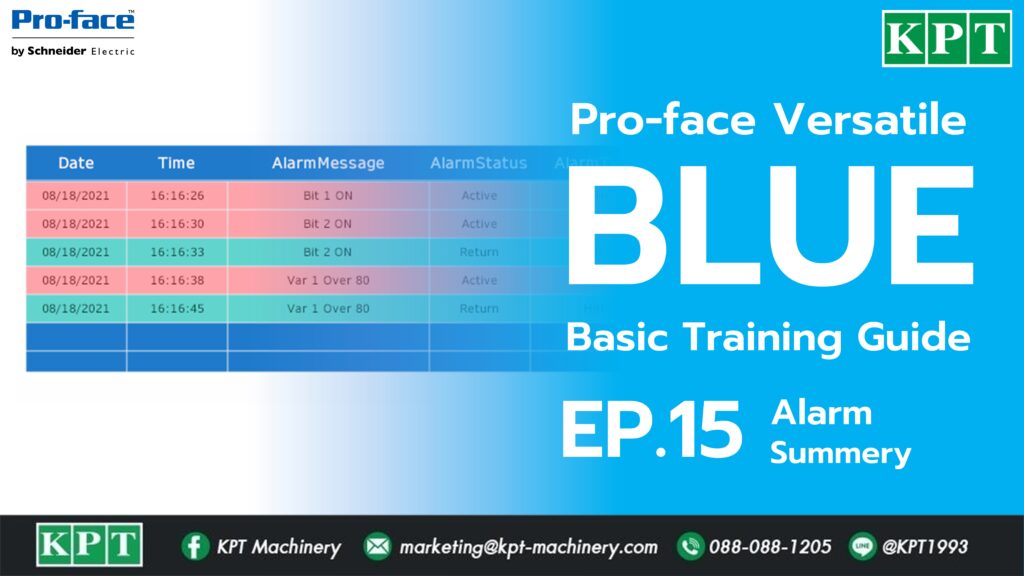
[Pro-face] [BLUE] การแสดงผล Alarm Summery (EP.15) “ BLUE Basic Training Guide EP.15 การตั้งค่าการแสดงผล Alarm Summery รูปแบบ Mode ต่างๆ “ Alarm Summery มีรูปแบบ 3 Mode– Active– Historical– Log Part 1 : Add Alarm Group 1. ไปที่แถบ Tool Chest2. หมวด Part -> Alarm Summery3. ลาก Alarm Summery ไปวางบน Screen 4. หน้าต่าง Properties -> เลือกแถบ Basic5. […]